
What are blocks?
 Basically, blocks are any content that you insert into the post or post of your blog. The functionality of the old editor was more like Microsoft Word – it was possible to work only with text. To add a video, button or photo gallery to an article, you had to search for a suitable plugin or write HTML yourself.
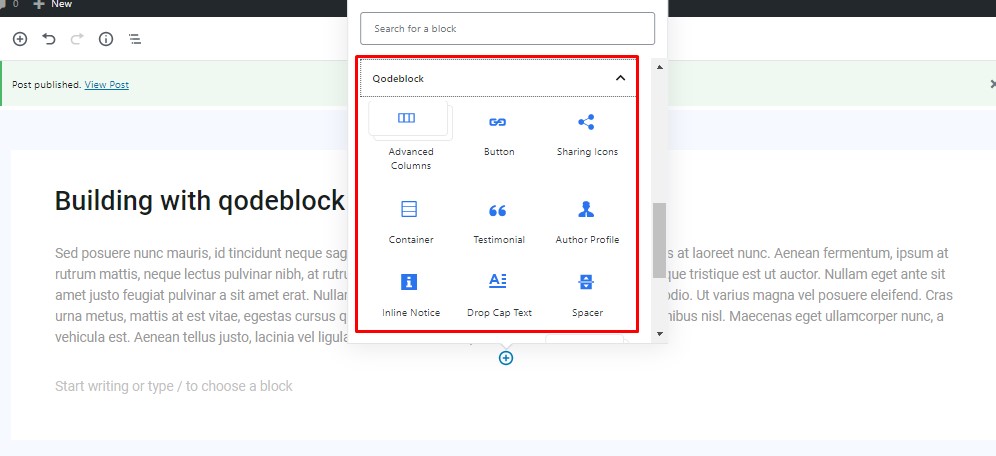
The Gutenberg editor has a modular structure. Now every paragraph, heading or illustration is a separate block. The new editor has several default blocks, such as paragraphs, images, gallery, and more. With qodeblock, you get additional blocks that can help you create even more dynamic posts and pages. The qodelock includes the following blocks:
- Testimonial
- Inline Notices
- Author Profile
- Drop Cap
- Spacer
- Sharing Icons
- Button
- Accordion
- Call To Action
- Post & Page Grid
- Container
- Pricing
- Email Newsletter
- Advanced Columns
A detailed rundown of each editor block can be found below.
qodeblock plugin installation & settings

Before installing Qodeblock, make sure you are using the Gutenberg editor. In case you used a classic editor you need to deactivate it. Now you can install the plugin qodeblock. To do this, go to Plugins → Add New.

Enter in the Search area “Qodeblock”. When you see in the search result Qodeblock, click on “Install Now”

After succsessfull installation Activate the plugin. Once you install the qodeblock, you will be redirected to the Getting Started Page, which provides you with all the information about the plugin.

How to add blocks to your post or page?
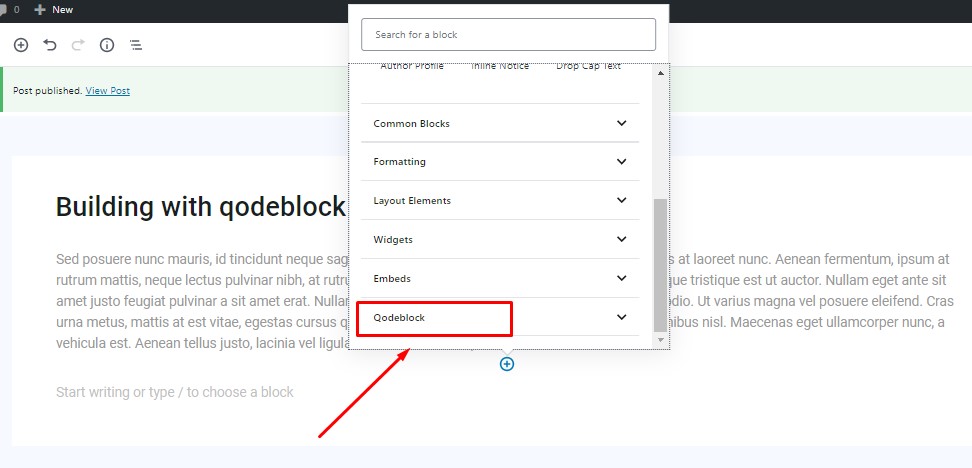
To add a new block or embed content, there is an icon + under all existing blocks. At the top of the page there is also an insertion button. The top menu is attached to the top of the editor, with such images the insert button is always visible. Clicking the + symbol displays the menu with the most commonly used blocks. Look for “qodeblock” in the search box to open all available blocks. Select the block you want to use and click on it to add it to the editor.
How to change block settings?

After adding, for each block there is an available set of settings that can be found in the inspector. The inspector is a sidebar panel that shows when you click on any block. To open the configuration panel of the needed block, you just have to click on it. Note that each block is configurable separately. Even if there are 2 or more identical blocks, the settings you choose apply only to the block in focus. It allows you to get more variants of posts layout.
qodeblock plugin includes:
Inline Notice Block
This block is used to create notifications or special messages on the page. It helps to highlight some information or draw attention to specific content. The block is fully customizable. Settings allow you to change settings like font size, notice color, text color and whether or not to make the block dismissable.

The dismissable notice works by using localStorage. Once you close the notice on the front end of the site, it won’t show again unless you clear out your localStorage. Please note that if you close the notice on the front end, you will still see the block in your editor until you remove it.
Testimonial Block

This block allows you to add a testimonial area to your post or page with with testimonial text, a citation name and title and avatar. The Block Settings includes such options as font size, font size, avatar shape, background color, text color, link color and social media URLs.
Author Profile Block

The block allows you to add information about the author as a user profile. Here you can enter a name, add a position and a description, download an avatar, and provide links to social networks. Optionally, you can change the font size, avatar shape, background color, text color, link color, and social media URLs in the block.
Drop Cap Block

This block allows you to add a stylized letter at the beginning of the paragraph with the font size and style settings Drop Cap (Letter, Square, Border)
Button Block

The block makes it easy to add a button to a post or page. You can completely set the style of the button and adjust it according to the design of your site. The following options are available for setting: the link target, button shape, button size and button colors.
Spacer Block

The block allows you to creatively divide the content of a page or post using spacing or line. You can experiment with the design, changing the height, color and style of the divider in the block settings.
Accordion Block

This block is a perfect choise for creating a FAQ page or other content with drop down text. With the settings you can specify the desired font size and options for switching the open accordion by default
Call to Action Block

A Call to Action Block allows to persuade a visitor to perform a certain act immediately. “Buy Now!” and “Register Today!” are some common examples. A CTA block perfectly used into sales scripts, advertising messages or web pages that encourage consumers to take prompt action. In this block you can change font size, text color, upload image for background, fully customize button ( size, shape, color and paste your URL for redirrect)
Sharing Icons

This block allows you to add Social Media Sharing Icons to you post or page. Here is the list available Social Media : Twitter, Facebook, Google, Pinterest, Linkedin, Reddit, Email. You can also change shape, size and color your button and select what you want to display (only icon, only text or icon with text)
Post and Page Grid


This block helps you to create beautiful post or page grid and list to display the posts, the posts/page of specific category, tag, author easily, without any line of code! You can customize block and change it as you need.
- Post and Page Grid Setting – Here you can change content type for displaying (post or page), select category, enter number items and columns and set ordering for your content
- Post and Page Grid Content – This setting area includes the options for display or hide Section Title, Author, Date, Excerpt and Continue Reading Text
- Post and Page Grid Markup – Here you can change the post grid section tag to match your content hierarchy and set the post/page title tag to match your content hierarchy.
- Advanced – Here you can enter additional CSS Class
Container

This block allows you to select part of the text in the container and set the desired color or image to the background. You can also customize the Drop Cap Litter and set the font size
Pricing

Pricing Block allows you to create price tables and display service packages. Absolutely all blocks are configurable. You can add an image, a list of services, a price, control the background colors, text colors, layouts, and the position of any of the pricing tables.
Email Newsletter Block

Using this block, you can add Mailchimp Mail Subscription Form to your website. In the settings, select the desired list of subscribers and cusPay attention, you must enter your newsletter provider API keys in Qodeblock Settings to use this block. You can changed color, text and shape button, color text and the padding applied to the inside of the block.
Advanced Columns Block

The Advanced Columns Block allows you to create your own page layout with a simple setup. You can specify the required number of columns, and the layout for each column. You can also customize the colors, margins, paddings, responsiveness, and much more.